Monday, December 21, 2015

1848 Stage Coach Wood Model Kit by Latina (Body Assembly)

With the two Body Sides complete I framed up the cab.

I started the framing with a bottom and two end pieces, it is important to double check the "squarness" it would be very easy to get a twist cemented into the pieces.
The thin plywood from the kit is attached.

Next was all the stringers, this turned out to be a two step process; first I laid in one layer but that was very difficult to get even so I then placed another layer over that. Ultimately the plan is to be able to sand over all the stringers uniformly   so they apear seamless. The second layer also allowed me to precisely create the door cut-lines (very important)
My next experiment is filling the edges of all the stringers, there are many ways to skin this cat, this is one.

This is the 1st layer of Spackle applied to the edges of the stringers, the new Spackles on the market are substantially easier to use than the old ones.
This is the 1st time I have tried this material but after all those years of buying fillers that are very expensive and take forever to dry I challenge anyone to come up with something better.

Here is what the WF coach looked like last summer in Oxford Mi.

Getting very close to painting.


More to come........

1848 Stage Coach Wood Model Kit by Latina (Body Side Panels)

So again, the kit build up of the body sides is certainly one way to do it, there are many, and we all work within our own scope of "best solutions"

Another two - sided milling.
This piece was as close to the max size I can mill.
I milled in all of the curves, I really had no idea if this would work.
Trimmed out by hand.
The 12lb is so light and fragile at 0.200" thick that I put a layer of FG on the back side, I don't think that i could have built it up with the stringers without it.


Some of the cool reference on the net.


1848 Stage Coach Wood Model Kit by Latina (Roof Panel)

Wishing to have a more attractive roof panel I surfaced a subtle curve into the top.

Machined from 12lb tooling foam.
In order to do two - sided millings you need a referance point that is the 1/8 hole in the center, this makes it very easy to find X & Y 0.

Once I had all of the surface worked out I wanted to have the stringers on top curve or sweep in a way that is directly related to the existing shape.


I started each one at one end and moved across slowly.
I also included the holes for the railing in the milling operation.
I used the under coat spray (assuming the roof was tarred? And tung-oil finish on the sides and stringers.


Sunday, December 20, 2015

1848 Stage Coach Wood Model Kit by Latina (Interior Seat Cushions)

The kit has (for me) too much emphasis on the interior.

My interest in the build is to have a very pleasing exterior and only enough interior to get by while looking thru the windows.

I also have no interest in doors that open in fact they would limit the continuity of the exterior surfaces and the stringers.

Back to the seats.

I decided to mill the button tufting into a piece of 12lb foam. The 12 lb is nice because you can cut at a high rate of speed. 

Seat back and cushion all in one milling.

Cut out and trimmed to fit, ready for painting.
I needed something that would fill the pours of the 12lb foam easily and give a dark black.

I came up with a two step finish that started with spray underbody coating sealed with water based poly. I put brass nails in for the buttons.

In the shadows of the interior they are going to be OK.

Wednesday, December 16, 2015

Kaiser Maximilian II 16th century Armour - IMEX Plastic Model Kit


I picked this one because it is aesthetically pleasing and has the gun-blue metal in contrast to Otto Heinrich model.

The Kunsthistorisches Museum has the work in its collection.

What a stunning piece. My long background in body work, Auto body design, and Auto body surfacing, is only part of what makes up my interest in these craft-works.
I will give credit to the writings of Sir Walter Scott for really peaking this interest.

I ordered a new sheet of Bare Metal Foil in the "Black Chrome" style. Unfortunately it is just the standard chrome with some sort of black coating. That said, it is still far better than paint.

1st level assembly is everything that is shingled under the next level of parts.

Critical for me is edge thinning and grooving edges.


This is to ensure that the foil edge is thin and the painted parts have a distinct ditch to paint into.


Foiling is slow and done in many small pieces. I'm going to redo the parts of the legs with creases.
You have to develop your own plan and so it is best to do an easy area and practice before you can expect to get it right.
This suit has a lot of gold leaf so it will be really nice with the high contrast.

Start of the leafing, the shingled effect of certain parts requires leafing the innermost parts.

I've had just enough experience with leafing that I have become aware of the futility of too much time spent on (faux) leaf.

So don't be afraid waste is an inherent part of the process.

This pic is the worst case, I have found that the best way is the snip strips off of the sheet of leaf and drop those onto the sizing.


So the Black foil is a total bust! I am in do the best you can mode to make something of this model short of a re-purchase.

My current plan is to leaf the parts completely and then paint the black in, maybe this will work better?
The trick with the leaf is as soon as you rub it down you can use compressed air to blow the unglued parts, works pretty well. 

So far so good, Patients!

Knights of Ni?
No "It's only a flesh wound

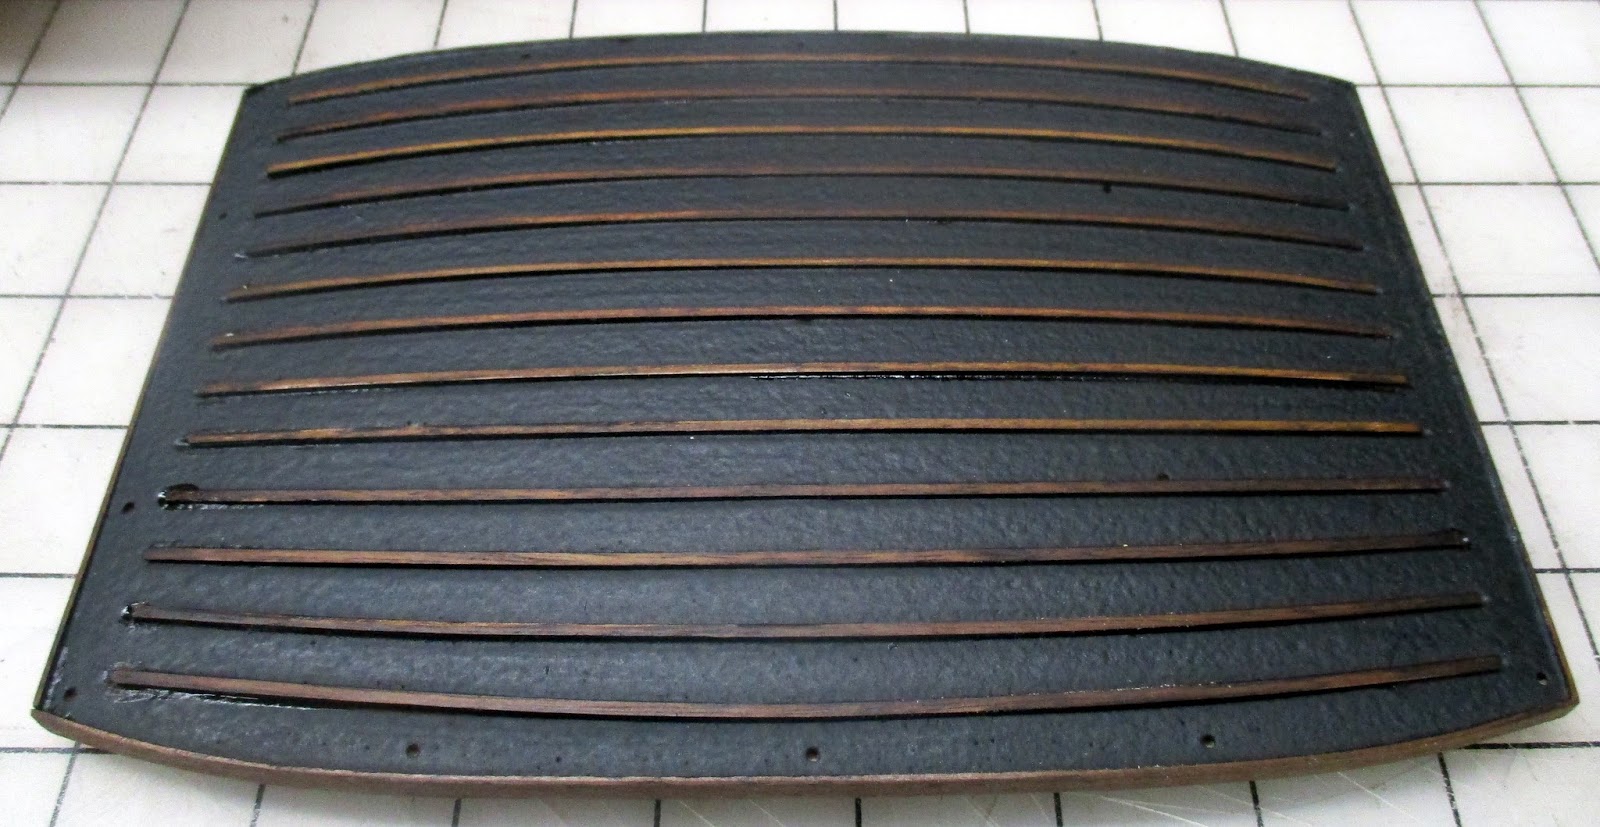
Having a large supply of Corion I picked out a black with specks of grey in it. I machined a 1/8" radius around the perimeter and leafed that, the added the scribe lines to make a tile floor for Max to stand on.

Painting one area at a time and leaving MM hanging in the hot air stream of the furnace is my current system to get the paint to harden over night.

Totally disappointed, but I got a lot of good practice with the leafing.

Gold on black is not an easy road; black enamel paint is difficult to get hard enough so that you can leaf next to it without the potential of it sticking where you don't want it.
I think that a lacquer dried and hardened over at least a week would be a better alternative.

A good model; a tough build in black.

I love the "persuader" in his right hand; 5lbs of "take that"


Tuesday, December 15, 2015

1848 Stage Coach Wood Model Kit by Latina (Chassis)

Looking for a challenge and something that is true Americana, I settled on a stage coach.
I have a History of transportation collection that includes cars, buggies, tractors, tanks, and robots.
But there is something unique about stage coach.

Stage Coach Model Kit by Latina appeared to be a good choice, I have to admit that the kit is good but in many areas is mostly a "good suggestion" as to how someone might build one part or another.

I started with the chassis and the wheels.
After a couple of attempts I realized that the 6 segment wheels were never going to look round or planor or anything that I wanted.

I went ahead and machined these wheels with the notches for the spokes.


Don't have any interim pics but the chassis is a discrete assembly from the body, so I could complete it without regard to the Body assembly.

As I become more comfortable withe making my own aesthetic choices in each and every aspect of the build it becomes more fun.

The pin-striping is easier than it looks.

I wanted the metal parts to stand out so I etched then gun-blued them so they would stand out against the yellow.


Monday, December 14, 2015

Elector Otto Heinrich 16th century Armour - IMEX Plastic Model Kit

While reading so much of Sir Walter Scott's writings, Ivanhoe and the like I became interested in the details of the Armour.

Coming from a background of Automotive Body Engineering and years of auto-body repair before that I have a unique understanding and appreciation for the efforts and skill that went into the making and decorating of these fine works of art.

High technological development with no science to back it up required the skills of years of experience. just the making of steel was a batch process that would have become state secrets.

The Imex 1/12 kit is perfect, I quit making plastic model kits for the second time about 15 years ago but they are so appealing sometimes.

Having some experience with paints and how un-metal like they can look I decided to go with
Bare Metal Foil Chrome, this stuff is great. After plating it I used a foe gold leaf for the enhancements.


The base is a piece of Corian, helps add weight and looks like a marble floor. The base that came with the kit is exactly what I don't like but would be fine without any other resources.

I couldn't leave it shiny so I antiqued with some military paints. The foil really can be formed and stretched into every crevice.


Thinning the fat plastic edges is a must.


Kunsthistorisches Museum